As promised/threatened, here is another post for today. I want to show off the two cards I have made so far today! I'm pretty pleased with both.
First is a card I made to undertake two different Monday challenges: the Clean and Simple challenge, which called for using letters in our cards; and the Try a New Technique challenge. The Try a New Technique challenge had an option of doing two different things, picking one or the other or using both. I picked "the other." This is the "see through image"--basically an image is stamped and then a shape is cut out around it so that the stamped image touches the sides of the frame but the rest is cut away. I chose to use the combined challenges to make my second Christmas/holiday card for June:
I started with a plain white card and cut a piece of Fancy Pants designer paper to fit, leaving a 1/8" or so border. I found a square stamp in my collection with a wood mount the right size to make a window around my image and traced it in light pencil, then stamped the ornaments image (Imaginisce) in light green ink. Next I took my Xacto knife and cut out the square, going around the ornaments so that they "hang" from the top edge. I cut a square of light green paper just a bit larger than the window and attached it to the white card, then used foam tape to mount the pink designer paper on top of it. I added the letter stickers to spell out "joy" at the bottom. Finally I decided that it was a little plain even for a clean and simple card, so I outlined the window with silver glitter glue, and decorated the ornaments with stick-on rhinestones (Martha Stewart). I am so happy to be playing with some less traditional Christmas colors for a bit!
I also tackled this week's Mojo Monday sketch:
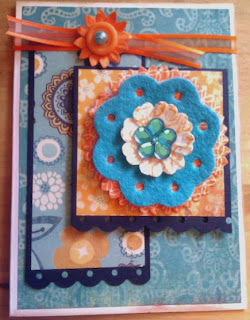
I was going through my scrap boxes to decide on papers to use--I knew I wanted a really vibrant mix of patterns for this card, and once again I found myself drawn to my current obsession, turquoise blue and orange. I picked out some partially used sheets and found some embellishments to go with, and got to work. Here is the finished project:
I stuck to the sketch pretty closely. Again I started with a white card and covered it with some background paper. I inked the edges using Colorbox cocoa. I decided to use black under the layering pieces so that I could pile on patterns and have them set off from each other. When I cut the black pieces out I made them a little bit long on the bottom side, and punched the bottom edge with my Fiskars "threading water" border punch. I attached the longer layer first and then added the square layer with foam tape.
I read an interview today in a Cards magazine back issue from last June, and the artist interviewed (Michelle Phillipi) said something that was still rumbling around my head as I worked--she said she comes from the "more is more" school of thought on layers and embellishments, and one of her tips is to add embellishments to embellishments, so I tried that here. For the focal image I layered a paper flower on the bottom, then stacked a turquoise felt flower, and a smaller paper flower (all paper flowers by Studio 18, in the dollar bins at Michaels; the felt flower and rhinestone flower are from a Chatterbox Artsylicious set). At this point I put a brad through them to hold them together, and then glued the rhinestone flower to the top of the brad with a glue dot. I used a couple more glue dots to attach the flower to the card. Then I added some orange ribbon across the top and covered the knot with the smallest of the paper flowers and layered an orange button and a turquoise blue pearl bead. Sometimes more is more! I normally would have stopped with the brad on the big flower and the button on the small flower but adding one more thing made it look better, I have to agree with Michelle!
Thanks for looking, enjoy the rest of your day!


Ha! I love it. I am so NOT a CAS cardmaker...and it looks like a lot of your cards are so I'm not sure if it felt right to you - but I think it looks great! For me, making CAS cards, I just can't stop. It feels like it's missing something. My latest thing is that dang Tim Holtz Tiny Attacher - mini staples - if I think I am done and want to add just a lil' something without having to reinvent the wheel, I'm all about the little staples in the corners.
ReplyDeleteMore is more is fun...and it also uses up all the stuff we have in our stash too ;)